By Lindsay Farlow | Jun 6, 2015
(Read the Kegerator Project intro here, if you missed it.)
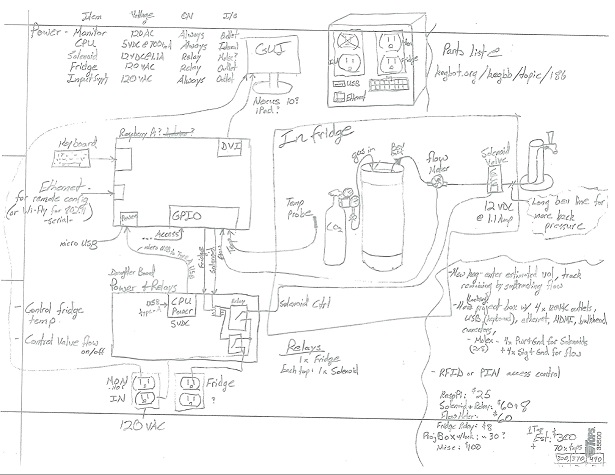
Once we had a vision for the kegerator, it was time to start designing. Here is the first ever block diagram, straight from the notebook of Senior Design Engineer Ken Wells.
The Raspberry Pi single-board computer was selected to provide the processing power for the kegerator for the following reasons:
- Good development environment (Raspbian Linux, Python, AdaFruit’s WebIDE)
- USB connectors for keyboard and mouse and Wi-Fi dongle
- Wired Ethernet and HDMI video quick for bring-up
- Setup was easy and straightforward.
- So many people are using Raspberry Pi that there are a ton of useful reference designs
- Ken had one lying around at his house
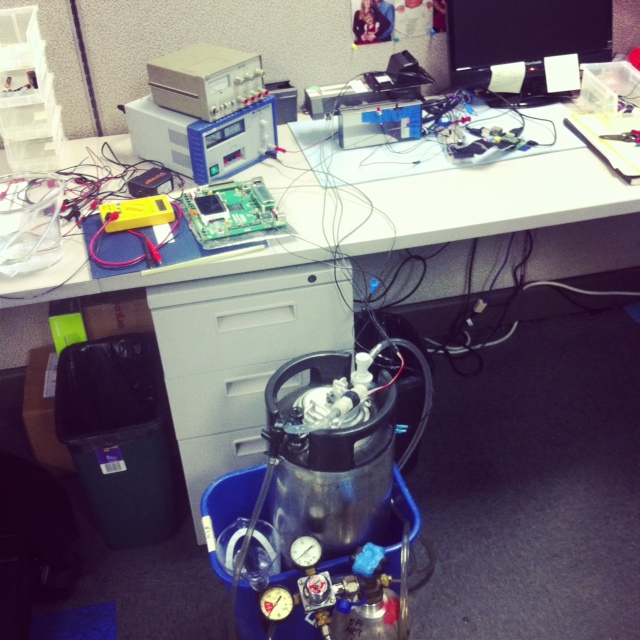
The daughterboard on the above diagram is currently just a breadboard, until we get the design finalized. At some point we’ll turn it into a perfboard, or a real PCB. Here’s a picture of the setup right in its current state:
We wanted to keep the user interface as simple as possible, so instead of using a keyboard to type in a password or PIN, the user logs in by just swiping their employee badge. The user then swipes again to log out after pouring, or the session automatically times out after a minute of inactivity.
A remote MySQL database stores a table of taps vs. keg IDs (each keg has a unique ID), kegs vs. beer information and price-per-ounce, users vs. their stats like account balance and email addresses, and a table that stores all transactions in order to create a usage log to help find bugs and to make pretty (and anonymous) charts over time. When a user logs in, their SQL data is loaded into memory in the Raspberry Pi. Their account is debited as they pour and the new balance is stored in the database when they log out.
To reload your account balance, we’re considering Paypal or similar web-based interface, or perhaps a bill reader; still some details to be worked out there. The bill reader would be convenient and less complicated (simple is good when you’ve already enjoyed a pint or two!)
Next, we need to get good and familiar with the inner workings of the fridge. We plan to disable the cooling on the freezer part, and use it to house the electronics and screen behind a piece of acrylic. Temperature reading and control are still TBD .
In our next post we’ll take a look at the software (Python), and show you a sneak peak of the kegerator screen graphics!